
Home prices are high and mortgage rates are rising, move in ready houses are in bidding wars – so why not find a house that needs some love and make it your own? I’m going to explain how to choose the best house to renovate – with only a screwdriver.
Home buying is a scary proposition and any house can have surprises behind the walls but some prep work before you pull the trigger can save you down the road, and this goes doubly so when looking for a house to renovate. Here is a list of what I’ve learned to look for in my own home buying and renovation process, but this can apply to buying any house.
So you’ve scoured the Zillow listings for houses in your dream area, you’ve gone to a few open houses, and after a few disappointments and getting beaten by cash offers you’re kind stuck. Now it’s time to flip those prices to list from low-to-high and look at some houses that have been sitting on the market for months. There are problems to be sure, but are they problems you can tackle?
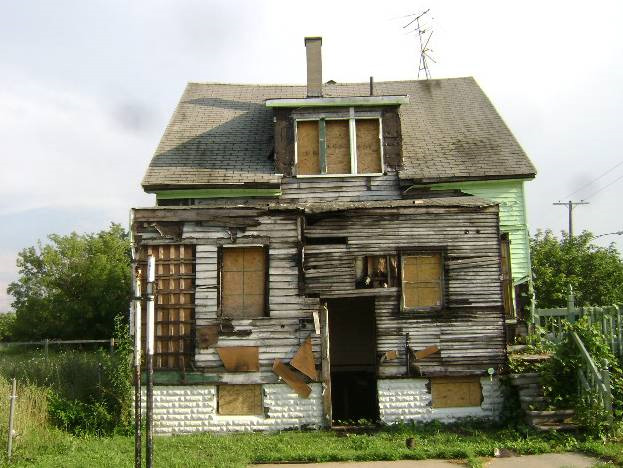
If you’re handy or patient and willing to learn you can save a lot of money on contractors during the home renovation process but even if you plan to farm out the complicated work you are going to want to get an understanding of the level of need in a house. Everything I’m going to share here I learned from personal experience. So… the hard way.
Check for Termite Damage
Termite damage is not a matter of if but when. It’s going to happen to a wood framed home at some point and the older the house is the more likely it has already happened. There are a few telltale signs such as mud tubes:
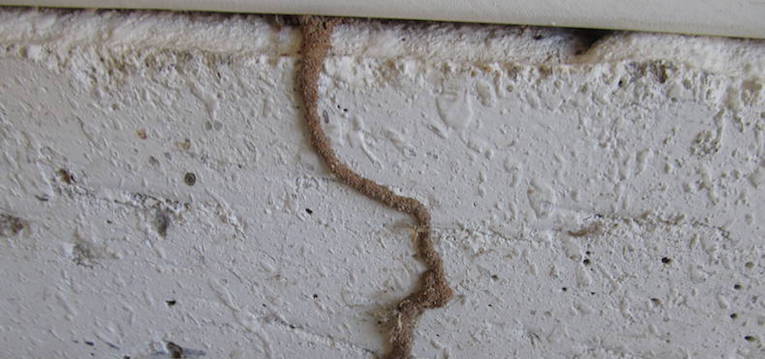
Termites hate the light and will build themselves little tunnels so they can go about eating your wood. If you can spot these then you know there’s some damage – but to what extent? That’s where your screwdriver comes in handy. Generally the termites will get in through the area of the sill plate, that is where the house sits on the foundation. Through settling/shifting/age there may be gaps that they can squeeze on through or they may just burrow through the sill plate itself if it’s exposed.
So just take your screwdriver and start poking. Start in one corner of the basement and work your way entirely around, give all of those joists a poke. No need to get stabby, if termites have done their work then the screwdriver will go right through like tissue paper. Something to keep in mind: if you’re getting a FHA mortgage you will NOT be able to close on the house until the termite damage is repaired. We had to repair the header in the basement before we closed. This only applies to visible termite damage.
Once we started doing the work we uncovered more termite damage near the first floor fireplace and the corner of the house under the siding. How did we know to look there? The tubes from the headers lead over to those areas. In fact, the termites made their way all the way up to the attic by way of the chimney, an infestation that likely lasted years.
Check the Electrical
After you’ve finished insect patrol you’re going to want to take a look at stuff you can unscrew. As you were checking the joists you should have seen the wiring running under the house. If it’s modern plastic coated wires then the house is at least sort of updated. If not, you may be seeing these things through the joists:
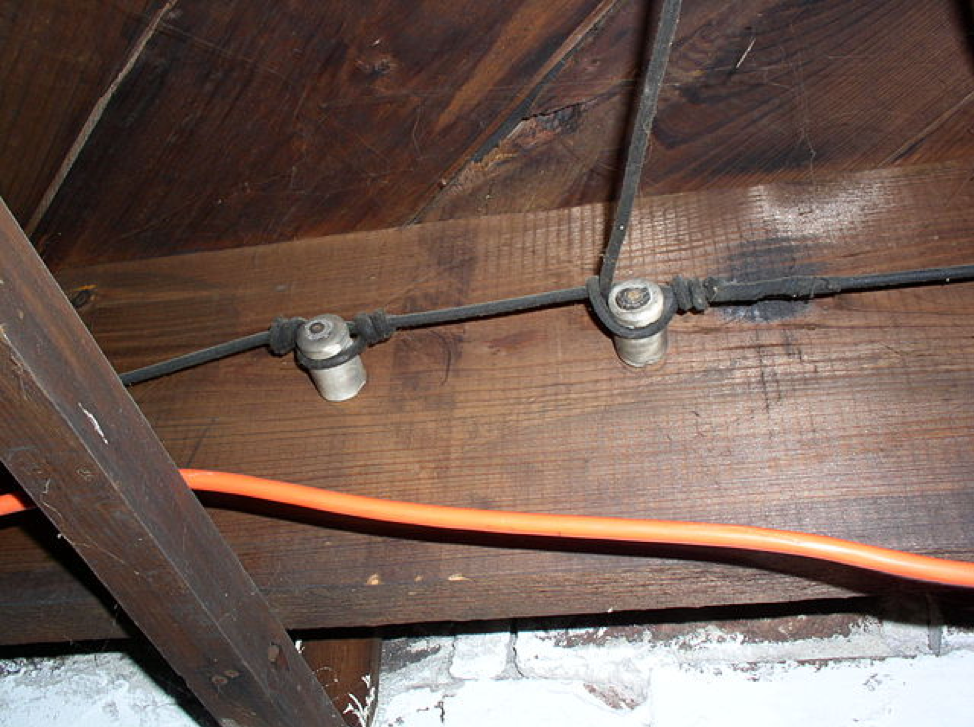
This is knob and tube wiring. It was used from the invention of home electricity up until the 1950s. If it’s still in the house you know up front you’ve got some out of date and potentially dangerous wiring. The fabric sheathing is likely dry rotted and who knows what’s been chewing on it. If there’s a crawlspace that you’re really against going down a telltale sign of older wiring are the two prong outlets – these things didn’t have modern ground wires.
I don’t recommend doing this at an open house but if you’re on a private tour with a realtor, head over to the breaker box and cut the power. Now you’re free to snoop in some outlets. If there are three prong outlets there should be a ground, so pop off a cover and look for two wires and the exposed copper ground wire. If everything looks to be in order hopefully the wiring has been done correctly but you can’t go much further without getting into the walls.
While you’re turning the power back on, check out the amp box. If it’s 75amps or even worse, 50amps, you’re going to want to have those replaced immediately. The modern power load we put on our electrical service is worlds apart from when the house was build. I have a handy guide for mounting your new fuse box to your brick foundation wall but if you need a new wire from the street you’ll have to take that up with the power company.
Check the Foundation
While you’re in the basement messing with the power and poking joists you can take a look at the foundation itself. The older the house the less likely the foundation is going to be made of cinderblock. My own foundation is a mix of giant boulders and bricks so that’s fun. My basement, every single time we looked at it, was completely dry. It’s a dirt floor and it was completely dry, smelled fine. Great. After we bought it a storm came through and suddenly there was two inches of water in the entire thing, prompting us to go through some serious waterproofing and sump installation. Now of course it’s completely dry but what did I miss?
When water is up against your foundation it’s always looking for a path. Pressure wants to equilibrate – what is flowing through the ground, it comes up against your foundation and it’s just going to push against it until it finds a way to relieve the pressure. A fully waterproofed basement will not give in and the water will disperse elsewhere. A non-waterproofed basement will show telltale signs of where the water has infiltrated. My brick foundation looked like this:
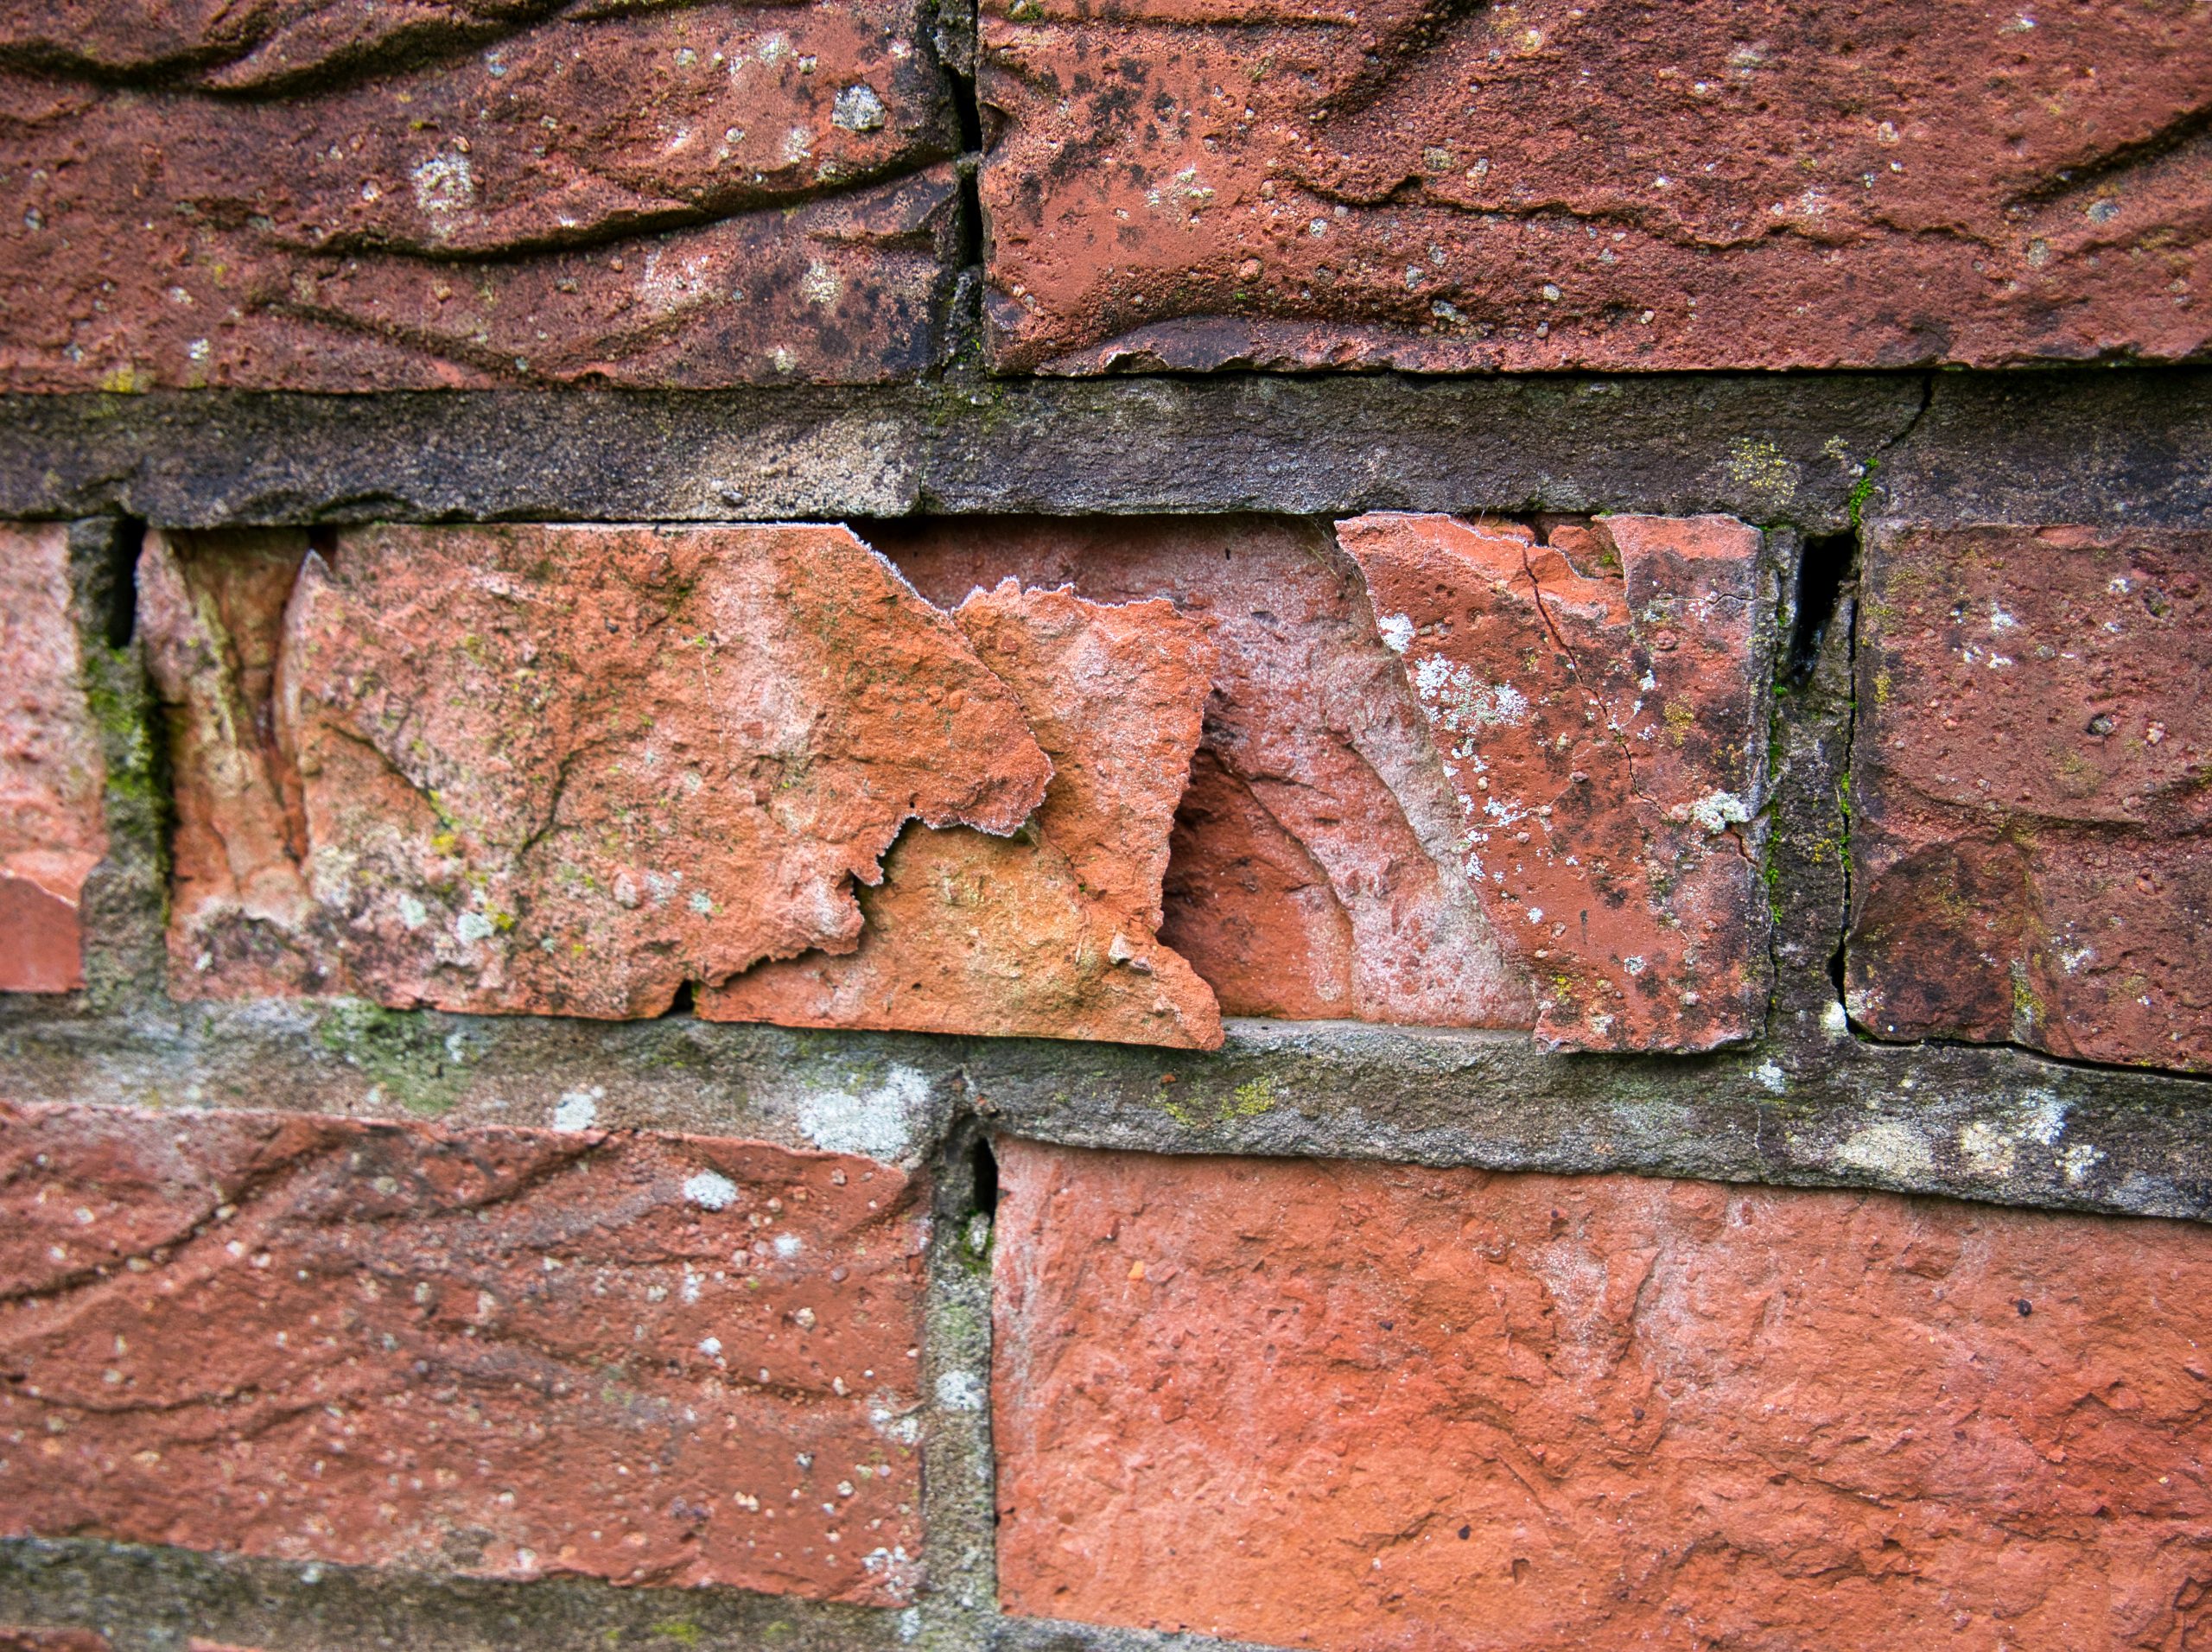
So what’re we seeing here? In the mortar between the bricks water pushed through small holes, you can poke them with your screwdriver to see if the mortar has powdered or if it’s a patchable hole. The brick itself has sloughed off, this is a result of water getting into the brick itself and potentially freezing, or just wearing away the brick itself until the front falls off. The white deposits are not mold but calcium. Water in my area is considered hard, it contains high mineral content. When it wets something and air dries it will eventually leave those minerals behind, so that’s what has happened to this brick.
There are several ways to fix this and none of them are easy (or cheap). The cheapest is to dig around the outside of the foundation and put up waterproof membrane. I mean around the entire foundation, every bit. It’s hard, exhausting work but it will get the job done. The most expensive option is to jack up the house and completely replace the foundation, that should keep it dry!
But something to keep in mind: old basements were made with water infiltration in mind. The floors are dirt because the water will just seep into them and disappear. It won’t smell the best but it’s not hurting anything really. My foundation only had some minor issues and it has been standing for 135 years. It’s when people try to waterproof a basement like this from the inside that real issues start. If they put up a skim coat of concrete on the inside all that will accomplish is trapping water in the brick – and that’s the worst of all the outcomes.
Check the Plumbing
While you’re still in the basement look at the water main coming in and try to find the drain heading back out. If you’re seeing cast iron water pipes just know that you’re going to have some serious problems because they’re prone to cracking or just collapsing entirely, and could look pretty rusty. Also, the inside of the pipes may have corroded from the years they have had water passing through. If they’re copper they might be in better shape and luckily you can tell just by looking at them.

If there’s green on your pipes then you’ve got water where it isn’t supposed to be. This could be from pinholes in the pipe, improper use of flux (soldering), or any other sort of water issue.
Once you’re done in the basement head up and give all the toilets a flush and run the sinks for a bit. See how fast they drain, if there’s a smell coming from them, and how the water looks as it comes out. If the water comes out or drains slow there could be some blockage from buildup in the pipes or potentially a huge problem with the line connecting to the sewer. I don’t have any experience with septic systems but if they’re over twenty years old you should be prepared for a $20,000 replacement in the near future.
Pop open the toilet tanks and unscrew the shower drains and take a look inside. You’ll get an idea of the maintenance on the system and what sort of effect the water is having on the drains. If there’s a backup of sludge and standing water as soon as you open the shower drain it may require something more extensive than a simple snaking.
If you do decide to redo the plumbing, I can’t recommend Pex enough. It’s cheaper to work with and faster to install. We used it through the entire house, converting the smallest bedroom into a laundry room and giving up half of the room to make the bathroom larger.
Check the Walls, Windows, and Insulation
Once you’re done playing with the toilets it’s a good time to take a look at the walls themselves. If your house is old enough the walls may be solid plaster. If that’s the case, just know that doing ANYTHING behind the walls is going to be a lot of extra work. Plaster is heavy, dusty, and a pain to repair. When done correctly though, it’s absolutely stunning and acts as insulation for the house itself. Even so, if there are cracks running up and down it you can likely connect it to foundation/joist problems you found in the basement earlier.
Should leaving the plaster alone not be an option you have two options. You can put up quarter inch sheetrock through the house, screwing directly into the plaster and having a fresh surface to work with. While this is cheaper, faster, and easier you’re really limiting yourself in terms of what you’re going to be able to do inside of the walls. Plus when you add up all four walls you’re losing an entire inch of space!
The other option is removing the plaster, but be prepared to add months to your workload. This was our first attempt but we quickly learned and got faster/cleaner but at the end of the day it took five thirty-yard dumpster filled to the brim to get everything out. Even so, once all that work was done we were free to redo the interior as we saw fit, a new house built within the shell of a classic Victorian.
As for insulation, the older the house the less likely there is going to be any insulation. Well, at least insulation as far as we’re concerned now, mine had a lot of old newspapers stuffed into the walls. Was very interesting reading about zeppelin attacks. But once your walls are open I can’t recommend spray foam enough. Our state had a huge rebate and interest free loan so it was a no brainer to get it done. We also took the opportunity to add forced hot air and central air. Since we’re so well insulated we really wanted to make the space comfortable.
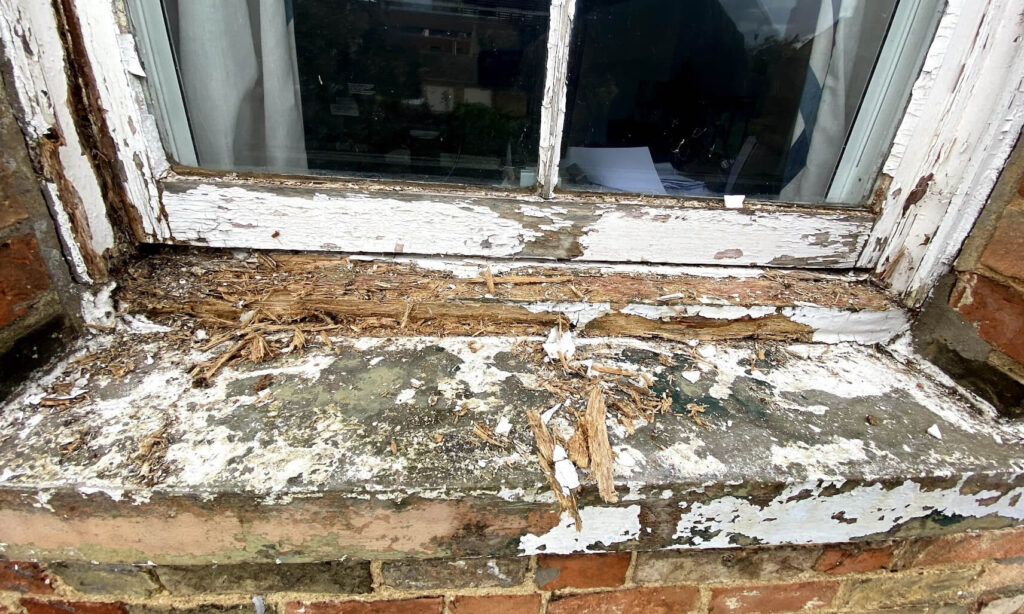
To make that space comfortable you’re going to need to make sure the windows are in working condition. Try to open every single one and check that they stay up. Older windows have a pully system inside and after years the rope may have snapped, and the windows will not stay under their own power. Older windows are single pane, wood framed, but if maintained well are nice to keep to maintain the character of the home. If at some point the windows were replaced they may be vinyl, which might be reaching the end of its useful life. We ended up needing to replace all of ours due to rot and that was very disappointing… not to mention expensive.
Check the Roof, Chimney and Outside Structure
Now that you’ve looked through the entire inside and determined it’s not THAT bad, go take a look around the outside of the house and take a peek at the roof. You’re going to be looking for peeling paint or other exterior damage and if the house is wood cladded, checking for soft spots. Take a look at the roof, look for moss growth. Older homes tend to have old growth trees around them but the downside of that is if the tree is too close to the house it could lead to moisture problems and premature rot.
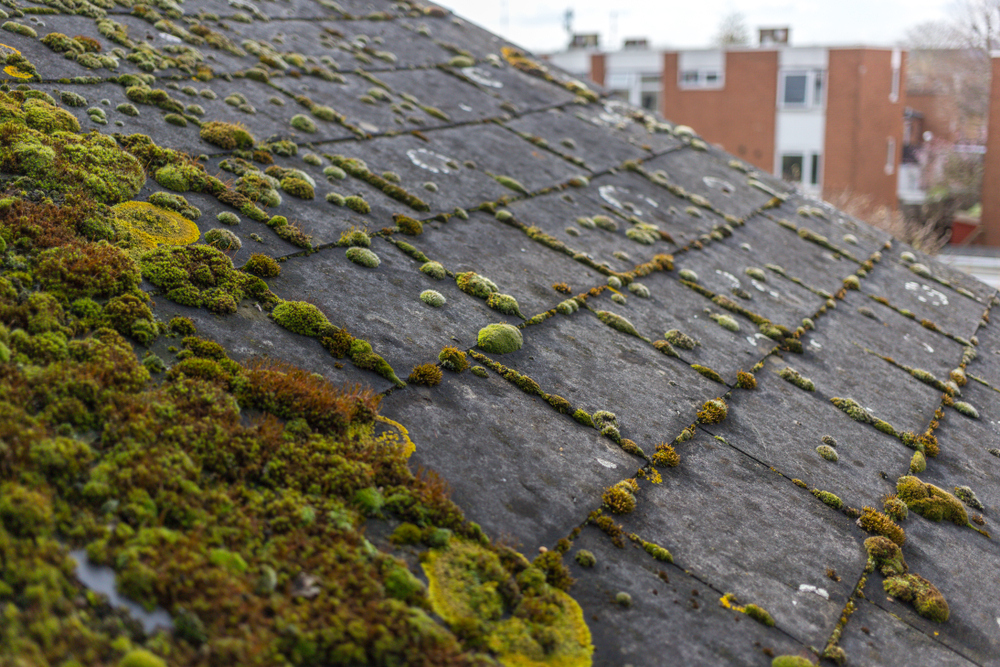
If the house is really old it may have a slate roof, which needs very little maintenance and may be able to be left alone entirely, their lifetime is almost forever. Any other material and you might have to think about a replacement. Our exterior had all of the aforementioned problems, and we wound up adding a new roof and then new siding.
I don’t think our house was repainted since the original coat was put on way back when and the house you look at may be very different. With proper maintenance, especially ensuring that bare wood is never exposed, the exterior of the house can last an incredibly long time.
Take a look at the fireplaces and chimney. Are they in good shape or falling over? Are the fireplaces wood burning or gas? Does the owner know if they’re functional? These are all important questions because chimney work can get expensive fast. We ended up having ours repointed and liners added, and removed an entire fireplace because it would never be able to be used up to code. A fireplace and chimney can be a powerful negotiating point, so make sure you really give it a good once over.
Negotiations
The person selling the house knows what they’re selling. You’re not buying a flip home, you’re buying something that’s beat up so the owner can move on. Or more likely you’re dealing with the estate of owner and they want nothing to do with it. For our house we threw in an absolute lowball offer, they countered with a thousand off the list price. We got back and forth and we eventually came up about 20% on our lowball – still 30% off of their asking price.
And they rejected it.
We thought it wasn’t meant to be but I told our realtor to let them know our offer stands unless we buy a different house so keep it in mind when the house doesn’t sell. A tad snarky but six months later we got the call that they accepted the offer. So we’ve hit our baseline offer. What now?
You take all of the stuff you learned from poking around with your screwdriver and going through the house and go in there with your home inspection and absolutely rip the house a new one. We then had specific chimney inspectors come in with a camera and go through the entire thing and give us an estimate to bring everything up to current code.
Armed with the inspection report, the chimney report, and a couple of ballpark offers from contractors we were able to get the price lowered another 20%.
This was $10k shy of our original lowball offer.
We closed on the house and get started working on it the next day.
Before You Do Anything… Check Yourself
Don’t use the screwdriver for this part. Taking on a project home is no small task and there are always going to be surprises, sometimes expensive ones. Even so, with the right amount of patience and dedication you could turn what some would consider a teardown into a showpiece home.
We took the approach of living with my parents while we worked on the house. We did not have children yet and I spent every evening and weekend for almost four years working on it. Not to mention all of my disposable income and then some, all while still paying the mortgage and taxes on a house I hadn’t even slept in. In the end we love our house but it was a long, difficult journey getting there.
My biggest piece of advice is to have a vision.
If you can see what the house looks like in your mind’s eye then you already know where you want to go with it. Think about what you’d be doing in the house if it were ready right now. What about five years from now? Ten? If you can see a future in that house then put an offer in. You can go through my blog and see all of the work and all the problems we ran into over the years but we’ve been in here for years and love it, now we’re raising our kids here.
Good luck, and happy house hunting.
One thought on “How to Choose the Best House to Renovate”